Afocal Deep Sky Astrophotography
I use a 8.5 inch F6 Newtonian on and HEQ5 mount plus Olympus 2020Z camera. I wrote this
stuff because I got fed up with reading on various forums how it was a waste
of time imaging anything except the moon and planets with a cheap digital camera.
I guess if you have much a smaller telescope aperture you might struggle to do much with
the limited exposure times available to non-DLSR digital camera. But I have never
tried, so I don't really know!
Update for 2008 onwards: I now have a 4 inch F6.5 Celestron Nexstar on a GOTO alt-az mount - it works just as well for afocal imaging as the 8.5 inch - better on large objects in fact.
Update for 2010 onwards: well, I finally went down the DSLR route and started prime focus imaging. I did seriously consider a new P&S, but it is now very difficult (almost impossible in fact) to find one with a threaded lens.
Anyway, for what its worth, here is how I used to do it ...
Pros and Cons of Point&Shoot digital cameras cf DSLRs
Pros
Cheap
Light
Easy to vary image scale
Focus position similar to visual
Fixed lens, so no problems with dirt falling on the CCD
| Cons
Cameras allegedly noisier than DLSRs (not sure this is true!)*
Light loss & optical distortions due to camera lens/eyepiece
Limited exposure times (can be overcome by stacking)
Small effective camera apertures don't full cover eyepiece exit pupil**
|
*You will often see it said that DSLRs are better because
their CCDs have larger pixels which can hold many more photons and hence reduce
the random noise. For everyday photography this is true - but the
reason this works is that DSLRs have much bigger lens apertures and so
collect much more light for a given exposure and F-number. In astronomy,
the amount of light is fixed by the telescope not the camera lens,
so this advantage vanishes (except see below!).
**Most compact digital cameras have very small
apertures on their wide field setting, e.g. my 2020Z has a 6mm focal
length at f2 => 3mm aperture. A low power eyepiece for optical viewing
may have, say, a 6mm exit pupil, so I am effectively limiting my
telescope to one of half the aperture. Zooming in, either with the
camera or the eyepiece, helps (gives a larger camera aperture or
smaller exit pupil) but, of course, reduces the field of view on the
sky.
How-To Image DSOs
The basic idea is to take lots of short
exposures and digitally add them together in a computer. Roughly speaking,
this is just as good as taking one long exposure. You will still need a
mount which can track though (for the length of exposures we are talking
here, either a cheap motor driven alt-az or an equatorial mount will be
fine). The camera
needs fastening securely and square on to the eyepiece. Ideally, the
lens aperture should be about the same size as the exit pupil of the
eyepiece and be positioned at a distance equal to the eye relief of
the eyepiece. There are various devices around to assist with this,
but there is no real substitute for a threaded lens screwed on to a
threaded eyepiece! Unfortunately there are not many compact digital
cameras with threaded lenses. A camera with manual control is almost
essential and you will need some way of triggering the shutter
remotely. Focus both telescope and camera on infinity. Take various
test exposures to refine the focus (this means examining the shots on
computer - I have never found looking through the camera LCD
successful). Choose a target - exposure for as long as you can (or as
long as your mount will allow). Repeat. At regular intervals take dark
exposures in order to remove hot pixels from the images.
Camera
There are several desirable features of the Olympus 2020Z which lend
themselves to astrophotography.
Whether one can still find them in more modern cameras is debatable:
- Infra-red remote control of the shutter
- Threaded lens
- Full manual control
- 16sec maximum exposure time
- F2 lens
- 4 micron pixels
Mounting
With a threaded lens the 2020Z can be attached securely to an eyepiece by means
of a T2 adapter which fastens to the top of the eyepiece with three metal
screws and an Allen key.
This assumes the eyepiece has a suitable groove in which to site the adapter.
For eyepieces without I have used a Scopetronics adapter which simply
holds the eyepiece with nylon screws. However this proved very difficult to
align correctly, especially in the cold and dark!
If you do not have a threaded camera lens (and most modern compacts - but
not all - do not) then you will need to look at one of the proprietary devices
available (there are some specifically for astronomy, but also try looking up
'digiscoping' on the WWW - people who photograph birds have been doing this
sort of thing for ages). Whatever you choose, make sure to make a light
tight seal between the camera and the eyepiece.
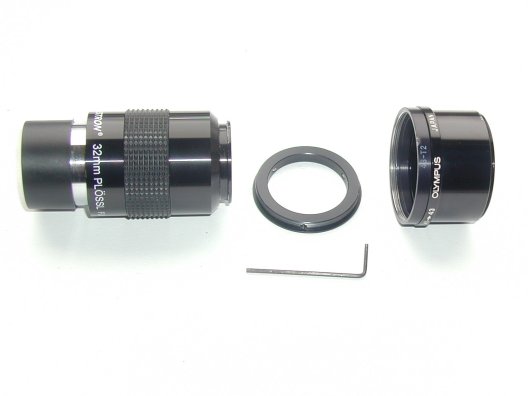 | 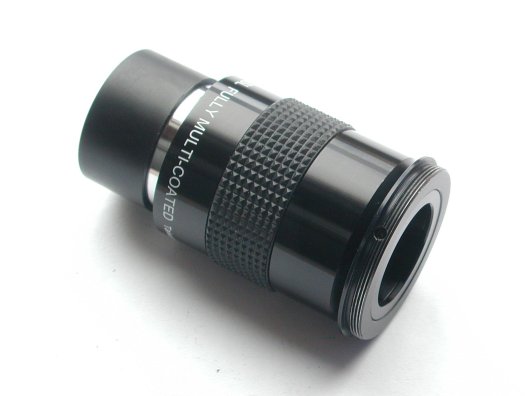 | 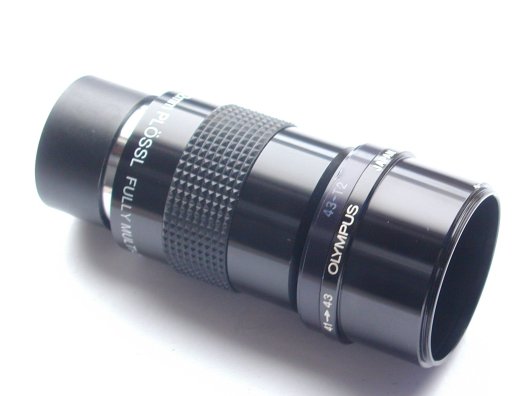 |
| Mounting kit disassembled - eyepiece; T2 adaptor; Olympus CLA-1 adapter plus 43mm-T2 step down (up?) ring. | Eyepiece with T2 adaptor attached. | Fully assembled, ready to screw onto the camera. |
Vignetting, or not?
You will read on the web that afocal imaging is usually a waste of time due to
vignetting. What is meant here is the fact that the camera images the end of
the eyepiece, and so you get a circular field of view (There is also optical
vignetting, where the intensity of the sky background falls off towards the
edge of an image. This is a separate issue and affects all telescopes/cameras
to some extent). Personally I do not consider this a problem.
What really matters is pixel scale and total field of view. After all,
telescopes give circular images, and cameras take rectangular pictures, so one
can never match the two perfectly. My preference is to see the whole field of
view of the telescope, which means that I consider a perfectly matched
combination of eyepiece and camera to be one where the narrow width of chip
is just filled by the image from the eyepiece.
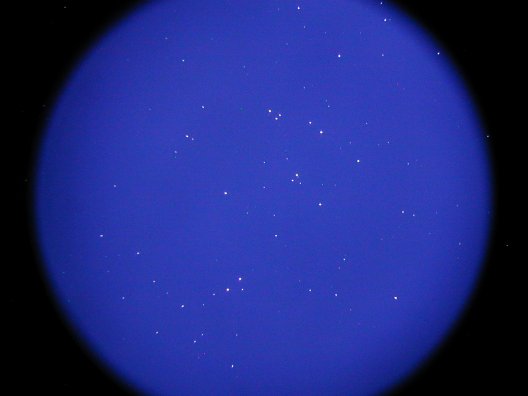 | The full 2020Z image of the twilight sky (M44 actually),
using a 32mm eyepiece. The view here is almost identical to what you would see by eye through the eyepiece. I consider this a good match between camera and telescope. |
The combination I use of F6 Newtonian, 32mm eyepiece and 2020Z camera,
gives about 3'' per pixel (the pixels are 4 microns), and field about 1 deg
across, which I reckon is just about right for most of the brighter galaxies,
clusters and nebulae. There may be an issue with the camera aperture being
too small for the exit pupil - I have still to investigate this.
It is possible to zoom in with the camera, or change to a higher powered
eyepiece, to get a smaller number of arcseconds per pixel, although this
puts more demands on the tracking.
Exposure times
Another comment you often see relates to the short maximum exposure times
offered by non-SLR digital cameras. It is rare even now to see much more than
16sec offered. However, again, I do not see this as a problem. In my
light-polluted skies, exposures much longer than this will simply be bright
orange! It also means my mount doesn't have to track particularly accurately.
Curiosity: Two times eight does not equal sixteen!
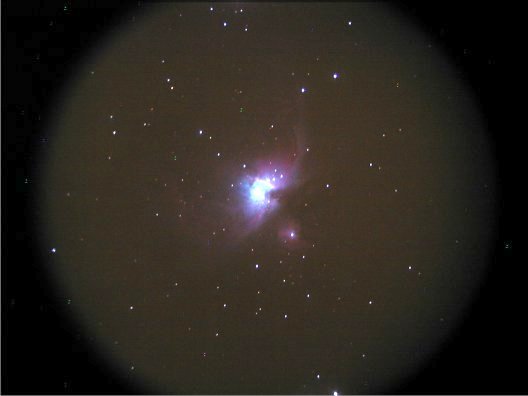 | 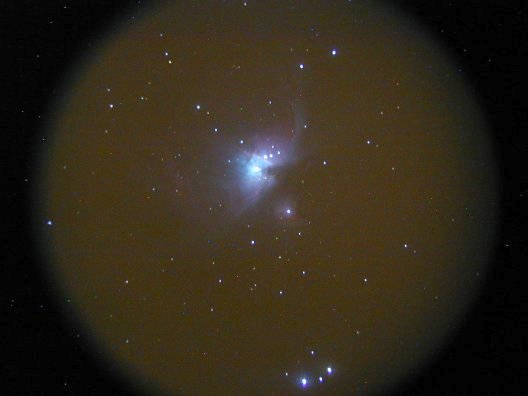 |
| Left: the sum of two
8sec exposures on the Orion nebula. Right: One 16sec exposure take at the
same time with the same ISO. The colours (and saturation) are clearly not
the same! |
I prefer the 8sec shots, but with the 2020Z there is a constant readout
time penalty with each exposure of a few seconds, so observing with 8sec
or shorter times is very inefficient.
ISO
When I started I just set the camera to maximum ISO (400
for the 2020Z) and got on with it. However, digital cameras are not
like film cameras, and ISO is rather a fake concept. In 16secs you get
16secs worth of photons on the CCD, whether ISO100/200 or
400. Changing ISO just multiplies up the voltage before it goes through
the A/D converter, so although you get brighter images (i.e. larger
numbers) at ISO400 it is not clear that the signal-to-noise ratio is
any better. In fact, if the read noise increases it might be
worse. What has become clear to me is that the colour balance is much
more `natural' at ISO200 than 400 (which tends to give too much
red/orange - and even if you adjust the colour balance you still end
up with a predominance of red noise in the image.), so at the moment I
take all my frames at ISO200 [I changed my mind on this one and
moved back to ISO400, but having read more about unity gain (see below)
I think more tests are needed. Another issue I hadn't considered before is
that of colour resolution at low signal - with only one or two counts from
an object, unless it is very strong coloured, it is going to come out grey, so in this situation higher ISO is potentially better.]. This, of
course, could just be a feature of the 2020Z.
Unity gain: in
fact, theoretically, the best ISO to use is that where the gain is set
so that one electron == one count. A higher ISO clips the
bright portions of the
images, whereas a lower ISO drops the faintest areas (i.e. doesn't fully
sample the noise). Assuming 12 bits
in the A/D converter, then for compact cameras this seems to be ~ISO100
whereas for DSLRs it is > ISO1000* (see e.g. the ClarkVision site). However, if like me you use jpegs, which are limited to 8
bits, it is not at all clear where unit gain occurs (it is not a figure
that manufacturers seem to want to give you!) - it might be at 16x these ISOs!
In principle, this could make you think that DSLRs have much lower noise
levels than compact cameras, because if you compared at the same ISO,
then the gain, and hence the noise, is about 10x higher in a compact
camera. However, so is the signal, so the S/N ratio really the same!! .
If you can retrieve RAW images with12 or more bits (as with most
DSLRs but very few compacts) then you do better here.
*If you are wondering why, then remember that camera
manufacturers
have to ensure that e.g. '1/250 sec, F8, ISO100 in bright sun' gives roughly
the same final exposure (e.g. the histogram in the same place) in any
kind of camera (otherwise normal, daytime
photography would be a nightmare!). But DSLRs collect many more photons
(about 10x in fact) due to their larger lenses, so to ensure the same final
count level in the image the gain has to set so that there are 10x as many
electrons per ADU in a DSLR than in a compact.
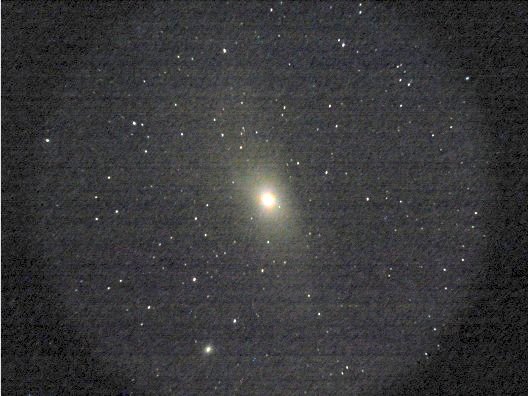 | 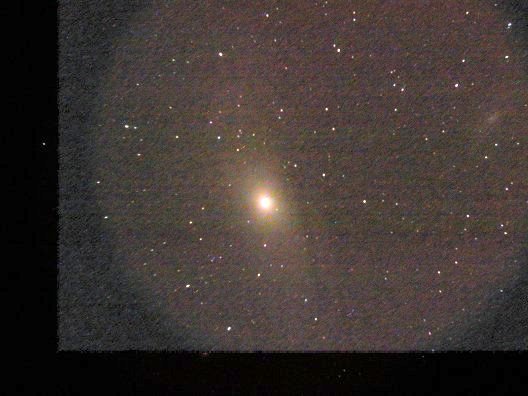 |
| Left: 3x16s ISO200
on M31 (dark-subtracted), with the intensities multiplied by 2 to
mimic ISO400. Right: 3x16s IS400 (dark-subtracted) taken on the same night.
Both frames have had their gamma levels adjusted (identically) to bring out
the background. The ISO400 shot is possible slightly deeper, but has an
annoying pink tinge. |
File type
OK, so I use jpegs - I probably shouldn't. But they are smaller and much
easier to save and handle afterwards, and my camera only offers tiffs as an
alternative. These are less compressed, but I am not convinced this makes
much difference for the average astro shot. Both formats restrict
me to 8-bit images (numbers from 0-255), which is probably what
the A/D converter in the camera is capable of. Ideally
one would like more but you probably have to get a DSLR for this (and find
some stacking software which handles 16-bit images)!
Update for 2008: While Comet Holmes was around I tried comparing tiff and jpeg - I couldn't tell the difference between the final stacked images.
Dark frames
The main reason exposure times are limited, of course, is that digital cameras
in general, and (maybe) point and shoot ones in particular, suffer from
excessive noise levels in long exposures (dark current, or 'hot pixels' are
the problem in fact).
You will never be able to image faint
objects such as galaxies and nebulae if you do not subtract dark frames from
your images. As I have light-polluted skies, I kill two birds with one
stone and use `sky' darks. I rest a circular diffusing screen over the
spider (made from one of those opaque A4 plastic pouches you can get at
stationary shops) and take an exposure of the same length as the image
exposure.
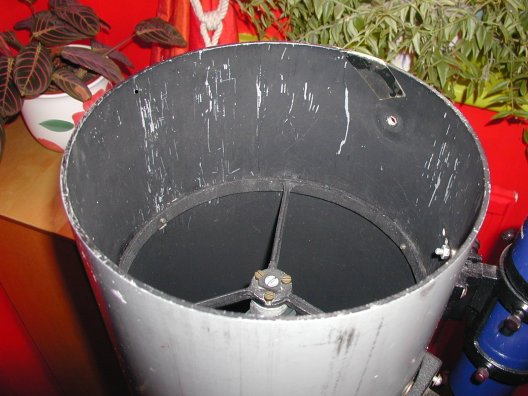 | 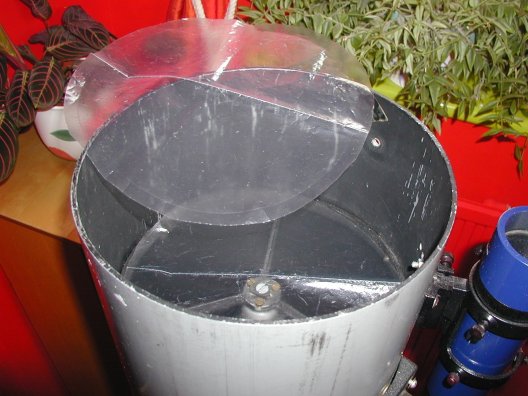 |
| Top end of telescope with and without
the opaque mask for taking sky darks. I have two masks, but usually only
use one. |
As the hot pixel count seems to vary dramatically with time (camera
temperature I assume), I usually take four 16sec image exposures followed
by one dark and use that dark only for those four exposures.
Subtracting the dark from the image frame not only removes the hot pixels,
but also the sky background glow.
Update for 2008: I have now decided the best way to remove dark current and the background sky at the same time is to take (~10) randomly positioned sky shots close to the object being observed and median combine them in DSS to form a master 'skydark'. The median combine gets rid of the stars and just leaves the background. This works pretty well, and I can now get away with, say, ten 16sec shots in row, rather than the four I was doing before.
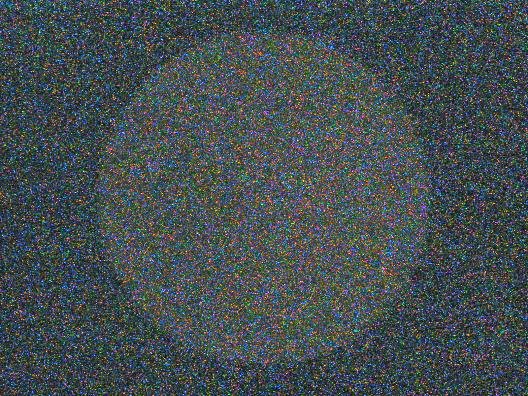
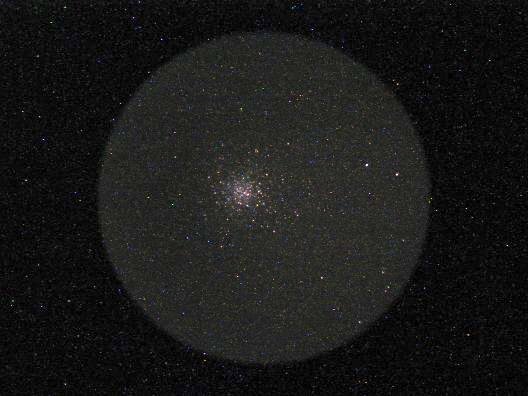 | 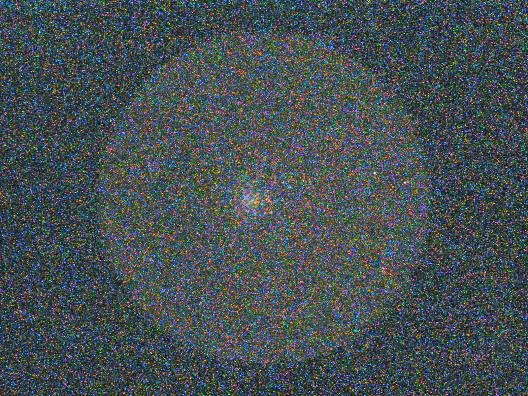 |
| Two 16s images of M13
taken on the same night width identical camera settings. Left, after
the camera had been idle for about 5mins; right, after about 15mins of
continuous shooting. (This is with a 7-21mm zoom eyepiece set at ~15mm
- the field of view with this eyepiece does not quite fill the smaller
dimension of the ccd.) |
 | 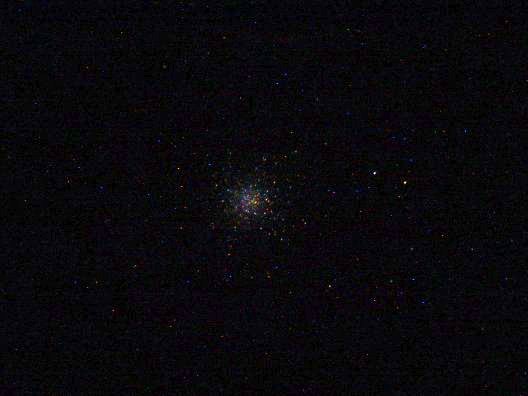 |
| Left: 16s `sky' dark
frame, taken with a diffusing screen over the end of the telescope
tube. Right: the result of subtracting the dark from the noisy M13
frame shown above. The display levels are identical for all four
images (although adjusted from 'raw' to display better on the screen). |
The effect of subtracting the dark is pretty dramatic, although clearly all
those hot pixels must have some detrimental effect on the image, and it is
better to start with less noise in the first place. This could be done if I was
willing to wait a few minutes between each exposure to cool the camera,
I guess, but this would
make total imaging times very long (which would require better tracking by
the mount).
I work on the principle that whatever you do to an image probably
degrades the signal-to-noise, so I never bother with flats or bias
frames (if you do insist on using them, note that they should have much
higher S/N than the final S/N in your stacked object frames).
If I could get away without darks I would. I guess one option
would be to create a hot pixel mask from the dark frames and just use
that when stacking the images, but then the sky background would have
to be removed somehow, and I have never found any software which did
this to my satisfaction.
There are a couple of other sources
of noise:
- readout noise: each time your picture goes
through the A/D converter a fixed amount of noise is added. So in
principle it would be better to expose for longer rather than add up
lots of shorter exposures. However, readout noise seems very low for
my camera and is not really an issue (this might not be true if I observed
from a really dark site or had RAW data).
- photon noise: in the
end, physics limits the maximum signal-to-noise you can get to
N/sqrt(N), where N is the number of photons you detect. This is why
stacking frames works, as it increases N (as does exposing longer, or
using a bigger telescope, or a more efficient CCD).
Focusing
... is a nightmare! I have a helical focuser, which makes life a little
easier - I take a series of shots, rotating the focus by roughly 30deg
each time. These then have to be examined on the computer (taking the media
card out without disturbing the camera) and the best angle
chosen. The trouble is that when slightly off focus I find it is that stars
at the edge of the field which go off first - this means that to achieve
best focus you need a 1deg field with bright(ish) stars covering the whole
area. This is not always easy to find, although a decent Messier star
cluster can help. Focusing on a bright star through the camera LCD appears
not to set the correct focus - I have no idea why.
The other thing apparent with my setup is that the field is not
astrometrically flat, even when in focus (certainly not when slightly off
focus). i.e. the image scale varies across the field. This means that if the
image moves much between exposures it becomes very difficult to stack
(see below), and images taken in different observing runs are almost
impossible to stack!
Stacking images
The only way to take images of deep sky objects when you are limited to
16sec sub exposures is to digitally stack (well, average) many of them
together. There
are many software packages out there to do this. I used to do it all
manually in GIMP, but now I often use Registax, or a combination of
both. My suspicion is that the best images come from dark subtracting
each frame individually in GIMP, then combining in Registax. Using a `master'
dark, formed by averaging all your darks together first, doesn't seem to work
as well.
I recommend some form of clipping or medianing, rather than straight
averaging. Some hot pixels always sneak through.
With my setup,
it pays to keep your individual shots pointing as accurately as possible
in the same
direction with the same rotation angle, otherwise you will find that image
distortions at the edges of
the field become noticeable.
 | This stacked, 7 min image of M71 shows the distortions you get at the edges
if you stack images which are not quite aligned on the same centre. This
is made much worse if you are slightly out of focus (which this probably was!).
|
Update for 2008: I now use the excellent DSS for stacking, whenever possible. This will correct for (much of) the distortion at the edge of the images.
So how may do you stack? Well as many as you like really - remember that if
your noise is dominated by photon statistics, then it
takes about 6x the exposure to go 1 mag deeper. So far I haven't tried more
than about 15mins
worth of exposure - although remember this probably takes 45 mins actual time.
In principle one could just keep going, but the tracking starts to wander
and I would need to keep recentering the object. Also, it gets very boring
and very cold, and once
the camera batteries go flat that's it, because the focus is bound to
change slightly
when the camera shuts down and
restarts (the lens on the 2020Z physically retracts), even if
you don't take it off the telescope.
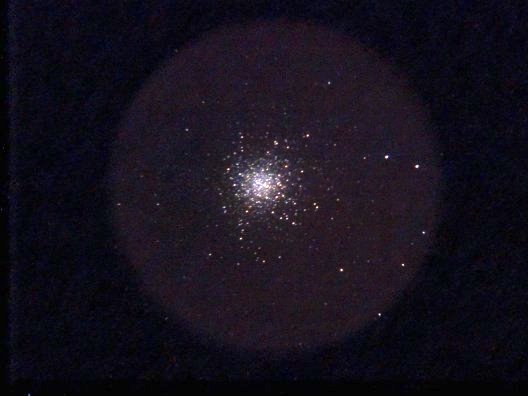 | The dramatic effect of stacking 40 16sec images
of M13 together. I confess there as been some tweaking of intensity levels
here to bring out the full glory of the cluster! |
So how faint can you go? Well, I have detected galaxies as faint as
14th magnitude in 15mins from my garden (with the moon up as well).
I have yet to try from a dark site, where I would expect to do much better.
You can see some examples of my pictures here (with the 8.5inch) and here (with the 4 inch).